Thursday, October 13, 2011

What to do when you lose your calendar?

So, I lost my calendar.  I'm one of those that has an actual, physical calendar in book form!  And I sync it manually with my Outlook calendar at home (because I still like those little reminders).  But I don't have a smart phone...my phone is an idiot...so I can't sync my Outlook with something that travels with me all the time.

But I lost my calendar...in the middle of October.  Do I buy another one?  I can't bring myself to do that, because I ALREADY have a 2012 calendar ready to go.  To avoid trying to keep Post-It notes in order in my purse (because, inevitably, that is what everything gets written on in my world), I decided to make a calendar.

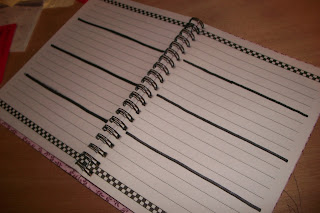
We started with an old journal I had lying around (purchased at Michael's from the $1 bins) that hadn't been used by anyone other than my 4-year old, who simply scribbled on every page he came across.  After tearing those pages out, I had just enough left to make a calendar with the 10 or 11 weeks left in the year (wow...really??).

Old journal book


Then add lines with permanent marker to divide each page into 4 equal parts 


 See...all nice and divided.


 Then, add in your month and year at the top of the page and fill in the dates for each week.


I wouldn't suggest doing this all by hand for a full year...it's very time consuming.  But to bridge a gap and fill a need for 10-12 weeks, it works quite well.  So that's my money-saving tip today.

On a completely unrelated note, I am starting to take a bunch of supplements...fish oil is among them.  Let me suggest investing in the "burpless" kind...trust me, you don't want to be burping fishy taste all day.  I don't care if you like fish or not.  Just a PSA.


Tuesday, October 11, 2011

Where socks go to find a sole mate...

I found this idea on Pinterest.  I loved it, so I recreated it myself, using clothes line I found in the laundry room and some foam scrapbooking letters I found in the box of such things...

Now I know where to find all those single socks, should I happen to come across another like it.

This is on the wall behind my hallway door.  If I had more space in my laundry room, I would have put it there, but wall space is premium real estate that is designated for vertical storage.  So this is normally covered up by a door, but it still provides a fun little "art" piece for such a mundane thing like lonely socks.  

It's like a Sock Singles Hang Out, if you will...of course, all you see here is a bunch of desperate guy socks...looks like we need some ladies at this party.  Let's see what I can find behind the dryer...


Monday, October 10, 2011

Other uses for stuff I thought I would use...

Alright, so if any of you out there are like me, you thought you were a scrapbooker, so you bought a whole bunch of supplies (enough to scrap the rest of your children and grandchildren's lives), made about 4 pages and then let all the supplies sit in your closet for 4 years.  No? Okay, so I'm the only one who will admit that I spent way more money than I needed to on a project I would never complete (and therefore will never remember my children's special moments--wait, no, that's not true.  That's why I update my FB status for every little crazy thing they do...capturing memories...yay!)  Back on the train...

So, now I (and you, even though you won't admit it) have a closet full of scrapbooking supplies and don't know what to do with them.  Well, short of handing it all over to someone who would actually use it for its intended purpose (some of which I will), I have found some other uses that I will share with you.  And for you ladies that actually DO scrapbook, I know you have a bunch of leftovers and things you don't want to trash...so here are some ideas for scraps.

A couple days ago I made this:

  
DIY Dry erase calendar

Supplies
  • 1 - 16x20 picture frame with glass
  • scrapbook paper
  • poster board
  • ruler
  • pencil
  • glue or glue stick
  • dry erase markers
I found a frame at the thrift store for $2.  Take your poster board and cut out the size to fit the frame.  A 16x20 frame works well because it gives you enough room to write, but doesn't take up too much real estate on your wall.  

First things first, I left a 1/2" boarder around the whole piece of poster board.  I did this so that I left space between the squares and the edge of the frame once I put it all together.

Now measure out your squares.  I made 7 rows and 7 columns.  The top row, obviously, is for writing the month and days of the week.  My squares are 2" tall and 2.5" wide.  I left 1/4" between each of them to make a pretty border between each piece of paper.

Then cut out your squares from your scrapbook paper.  I used 6 different patterns, but you could use just one or two, if you like.  Glue your squares on the grid you marked out and then frame it.

Now you have a dry erase calendar.  You'll never have to buy another wall calendar!  Yay!

Another project with scrapbooking supplies:

Mirror "decals"

I used to use dry erase markers on my bathroom mirror (I still do sometimes).  But some of the things I used to write with dry erase I wanted to be a little more permanent.  So this is what I came up with.  They are not permanent, but they are more so than dry erase markers.  There are two reasons I went with this option over the more popular rub-on decals.  First, this didn't cost me a dime I hadn't already spent.  I was re-purposing a product I already had.  Second, I could change these at any time, still not spend anything, yet, they don't come off when you accidentally spit toothpaste all over the mirror because your 4 year old says something like, "Mommy, I like hot girls," and you have to clean the mirror.

Supplies:
  • scrapbooking letter stickers
  • straight-edge (I used a level)
  • dry erase marker
Start with a clean mirror.

Use a level or straight-edge to make a line where you want your message to appear.

Draw your line with a dry erase marker, so you can erase it easily later.

(Make sure you choose letters that you have enough of to complete your message.)

Plan out your message and start at the middle.  For instance, my message of "flush, wash, brush, floss, lights" centers on the "u" of brush, so that's where I started.

Put all your letters up, then erase the dry erase marker with a soft cloth.


ENJOY!


Saturday, October 8, 2011

House Tipping (10/8/11)

Much to the dismay of my husband, I am taking a quick timeout from the Predators hockey game tonight (thank goodness for DVR) to make my daily update...so let's get this done quickly.

I made this tip on FB last week, but I will share it here:

CLEANING THE MICROWAVE
Take a lemon (or orange), cut it in half, place it in a bowl and put it in the microwave for 2-3 minutes.  The steam will help release the food particles.  Or, as suggested by a friend, take a damp sponge, put a slice of lemon on top of it, microwave that for 2-3 minutes and then you have a nice sterile sponge to clean the microwave.

I originally got this tip from a wonderful book I am reading.  I suggest you read it too.  It is an excellent look at WHY we should keep a clean home, not just a HOW book.


I will not be posting House Tipping on Sundays...they are simply too busy for me.  But I may have some other things to share.  Let's see how that goes.

In the meantime: LET'S GO PREDATORS!!

Friday, October 7, 2011

House Tipping (10/7/11)

Homemade Dryer Sheets

I have been looking for ways to save money around the house. I have made my own laundry detergent, which I will post when I figure out if I like it or not. But today was about making the bottles of fabric softener that I have gotten for less than $1 via couponing last as long as they possibly can. So here's what I have come up with:

Supplies:

  • Large resealable container with large opening (I use the disposable-type Rubbermaid bowls found at the Dollar Tree)
  • Concentrated fabric softener
  • Water

I keep a large Rubbermaid bowl in my laundry room with the following concoction - 1/4 cup concentrated fabric softener & 4 cups water.

To that, I add old wash cloths (I have several leftover baby washcloths that work perfectly for this).

When I have a load of laundry to dry, I take one cloth out, wring it out well, and add it to the dryer. When the dryer is done, I take the cloth, put it back in the bowl and use it again!

You can make this in larger batches (1 cup softener to 1 gallon of water), but you have to have a large enough resealable container and the place to store it...just keep that in mind.

When (if) I run out of fabric softener in the next century, I will share with you what I switch to. I am thinking I will be using vinegar in some way, but I am not sure which delivery system I like better...but there's something I really like about the scents of fabric softener from the store...I will be experimenting, that's for sure.

Direction...

I have no idea what this blog is going to turn out to be, but I suspect it will be a combination of many things. I love to craft, but right now my projects include using what I have to clean and organize, as well as get rid of a bunch of stuff...so if I can't repurpose it, it's out the door. Goodwill loves me.

However, I will begin posting at least one tip a day. It will be called "House Tipping". This should be fun.